How To Install Shutters To Vinyl Siding
How To Install Shutters To Vinyl Siding: A Simple Step-By-Step Guide
Shutters may seem like a simple detail, but they can change the whole look of your house. When added correctly, they make a home look well cared for and more stylish. People often notice houses with shutters first because they look polished and classic. If you’ve seen photos of house shutters before and after installation, you’ll see the big difference they make. Whether you're adding shutters to your new build or updating an older home, this small project brings big results. Shutters offer both beauty and function, making them a great improvement choice.

Understanding Vinyl Siding And How Shutters Fit In
Vinyl siding is a popular choice because it's affordable, strong, and low maintenance. It comes in many colors and styles, and it gives your home a smooth, clean look. But one question people often ask is: Can I put shutters on vinyl siding? The answer is yes. Shutters can be installed safely and easily, even on vinyl. The trick is to use the right parts and steps. Vinyl siding shutters are light and simple to attach. With proper care and correct tools, shutters stay strong on siding and give your home added charm for years.
How To Install Shutters To Vinyl Siding: The Right Way To Begin
If you're wondering how to install shutters to vinyl siding, you're not alone. It’s a common home improvement task that’s easier than you might think. First, pick shutters that are lightweight and made for exterior use. Next, clean the siding where the shutters will go. Then, hold each shutter up to the wall and mark where to drill. Use shutter spikes or special fasteners made for vinyl. These are designed to hold firm without cracking the siding. Learning how to attach shutters to vinyl siding starts with planning and it ends with a great look that lasts.
Tools And Materials You’ll Need For Safe Installation
Tools:
Tape Measure – For accurate placement and spacing
Level – To keep shutters straight and even
Pencil or Marker – To mark drill hole locations
Power Drill – For drilling pilot holes
1/4-Inch Drill Bit – Or the size recommended for your shutter fasteners
Fastening Materials:
Vinyl Shutter Fasteners – Designed specifically for siding
Plastic Shutter Spikes – Optional alternative, often included in shutter kits
Shutter Mounting Kit – (If included with your shutters) makes installation easier
Important Notes:
Do not use regular nails or metal screws – They can crack or damage vinyl siding
Ensure fasteners are long enough – They should reach into the sheathing behind the siding
Space fasteners evenly – This helps keep the shutter flat and secure

Measuring And Marking: Getting Ready To Hang Your Shutters
Before you start drilling, you need to measure carefully. First, hold the shutter beside the window to make sure it’s the right size. Most shutters are decorative, not functional, so they don’t need to open and close. Still, they should be even with the top and bottom of the window trim. Use a pencil to mark where the holes go. A shutter placement on house should look balanced, with each shutter equally spaced from the window edges. Use a level to make sure the shutter is straight. This step makes your final result look professional.
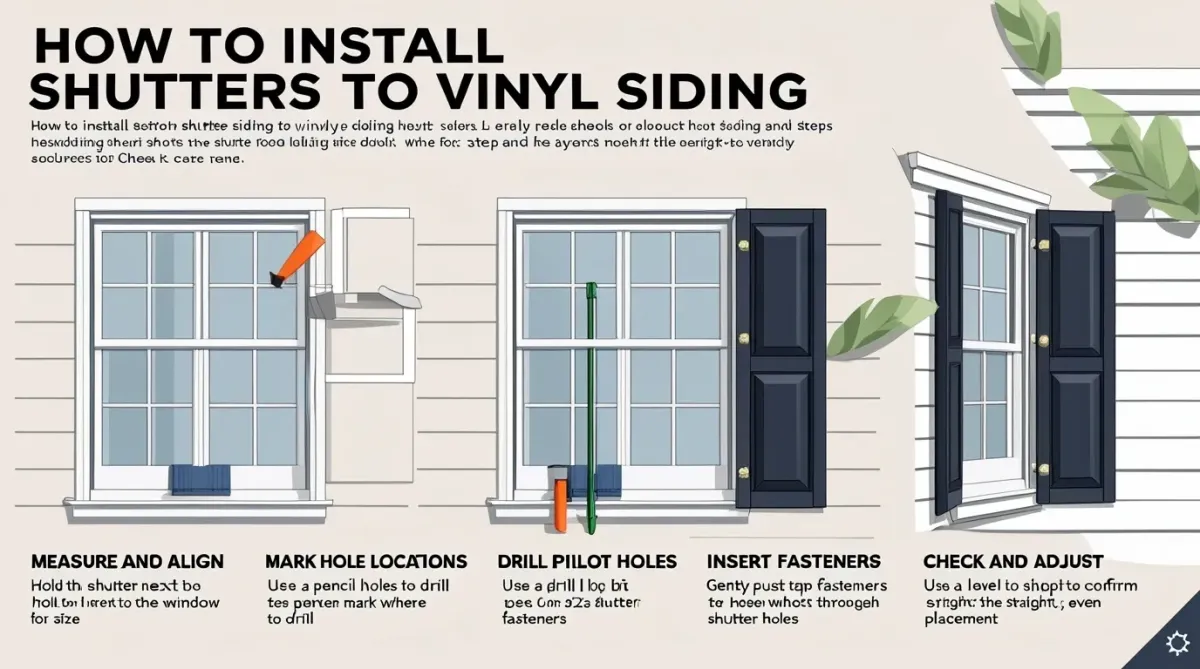
Step-By-Step Guide: Installing Vinyl Shutters On Vinyl Siding
Mark the Holes
Hold the shutter up to the siding where you want it installed. Use a pencil to mark the locations for the fasteners.Drill Pilot Holes
Use a 1/4-inch drill bit (or size recommended for your fasteners). Drill small holes at your marked points to prevent cracking the siding.Align the Shutter
Hold the shutter in place, matching the holes you drilled. Having a second person help you makes this easier and safer.Insert Fasteners
Gently insert the shutter fasteners through the holes. Push them in straight and firm, but do not overtighten shutters must be able to expand and contract.Check the Alignment
Step back and check if the shutter is straight and properly spaced. Make any small adjustments before finishing the final fastener.Repeat for Other Windows
Follow the same process for each window. With practice, you can complete each shutter install in under an hour

How To Hang Shutters On Vinyl Siding Without Drilling
Not everyone wants to drill into their siding and that’s okay. You can learn how to hang shutters on vinyl siding without drilling by using vinyl siding hooks or clips. These special tools slide under the siding panel and let you hang lightweight shutters. They’re perfect for renters or people who want to avoid permanent holes. Just keep in mind, they work best for smaller shutters and may not hold in windy areas. Still, it’s a fast, damage-free option that’s growing in popularity. It gives you a clean look without using power tools.
Installing Window Shutters On Vinyl Siding In Riverside, CA Homes
Homeowners in Riverside, CA often choose shutters to enhance curb appeal, especially in sunny weather where materials last longer. If you're thinking about how to install window shutters on vinyl siding, remember the climate matters. Use UV-resistant plastic for long life, and avoid metal fasteners that might rust. It’s also smart to install during cooler parts of the day to avoid heat-expanding the vinyl. The dry climate in Riverside makes shutter projects last longer with little maintenance. Accent Window Coverings has helped many local homeowners add shutters that not only look great but also last.

Replacing Vinyl Shutters: What You Need To Know
If your shutters are cracked, faded, or falling off, it’s time to replace them. First, learn how to remove shutters from siding by gently pulling out the old fasteners with pliers. Be careful not to break the siding. Once removed, patch any holes if needed. Choose new shutters that match the old size or go bigger for more impact. Replacing vinyl shutters is just as easy as installing them. Follow the same steps for drilling and fastening. Whether you’re upgrading for style or fixing wear and tear, new shutters can refresh your whole home.
Tips For Long-Term Maintenance And Visual Appeal
Shutters are low-maintenance, but they still need some care. Wash them once or twice a year with soap and water. This keeps them from looking dirty or faded. Check fasteners from time to time to make sure they’re still tight. If your shutters are painted, watch for chipping or peeling. Over time, you might want to update the color or switch to a new style. Looking at house shutters before and after photos can give you fresh ideas. Clean, straight, and well-kept shutters always add to your home’s curb appeal and value.
Accent Window Coverings: Your Trusted Source For Exterior Shutters
Installing shutters doesn’t have to be hard or costly. With a few tools, the right instructions, and the proper materials, anyone can improve their home’s look. Whether you're putting them up for the first time or replacing old ones, shutters make a difference. At Accent Window Coverings, we help homeowners find the right fit, color, and installation style for their needs. From choosing to mounting, we’ve got you covered.
Ready to upgrade your siding with beautiful shutters? Contact Accent Window Coverings today for expert help and friendly service that lasts.
